Monday, November 18, 2013

Tongue and groove ceiling work


Ceiling works are in with my favored projects and T&G ceilings are among these jobs that I am always glad to undertake.

In this particular project, we decided to stain the knotty pines boards before installing them in order to be able to play with the different tones and shades of the wood at the time of the installation.

Having the use of the proper scaffold allowed me to set up the miter saw on top of the platform and turn this task into a one man project.


Kitchen Installation

Kitchen installation, the most common of the millwork installation projects.

Kitchen installation is the most common of all types of millwork installations projects. Installing millwork requires a good level of finishing carpentry experience and better yet some practical knowledge of cabinet making. Having considerable knowledge of these trades will help to understand and resolve unforeseen problematic situations that could happen during an installation project.

Installing millwork is a task very difficult to improvise, the consequences of a considerable lack of experience will show long before the project is completed, very often with irreversible consequences and damaged materials.

Good millwork installers have the experience gained through many kinds of installations, after working with different types of materials, designs, finishing, they get to know all the procedures and tricks to achieve better results in each project.

The installation is a continuity and final stage of the cabinet making process, that's why very high end custom projects require properly qualify labour or the supervision of the same cabinets makers involved in the designing and building of the cabinets.

An updated set of drawings with all the changes and notes will be an starting point for an installation project. I usually request my installation drawings ahead of time to be able to make my own installation notes and prepare for possible unforeseen needs for the installation process.

Opening all wrapped pieces and identifying the location of every component and cabinet before starting to attach them is a always a secure way to proceed.

Calculating the high of the top line for the uppers cabinets, allows us to mark the bottom line for the uppers cabinets and double checking for proper high between counter top and the bottom of the uppers cabinets. A minimum of 18 to 21 inches will leave room for more kitchen appliances that could sit on the counter top of a finished kitchen without touching the light balance, of course that distance is limited in some cases for the ceiling high or a faulty kitchen design.

Some installer, including myself, prefer to start installing the uppers cabinets first, that way we do not have the base cabinets on the way and there is not chance of damaging them while we work in top of them.

No floor, wall or ceiling can be trusted and use as an straight line or reference to fix cabinets together, the use of shims are a necessity in the installation.

Fillers pieces against the wall, between cabinets or creating room in a corner help to maintain consistence cabinets lines and create the room for doors and drawers to open clear of obstacles.

One of the main reasons why a good installation job can not be improvise is due to the requirement of specialize tools to carry out such a task. Specific levelling, drilling, nailing and cutting tools intended for this kind of carpentry work will contribute with a professional finishing.

Identifying the lowest and highest spot in the floor area cover for the installation will help to offset the difference at he time for installing the base cabinets following an straight levelled line.

Most base kitchen cabinets will include a 4.5 inches high of toe kick space and a cabinet 30 inches high. 34.5 inches should be the rough high before counter tops and 36 inches total finished counter top high.

Toe kicks can be prepare and cut at any time but should be done in way that can be remove to install the rooms floor or simply install them after the floor is completed

Perfectly located and tied drilling holes for pipes, outlets and wires are signs of a neat installation job.
Countersinking all the attaching screws and hidden them when possible behind the hinges and shelf's lines help to maintain a clean finishing look inside the cabinet boxes.

Panels and gables should be scribe to the wall to eliminate gaps between the panels and the wall due to unplumbed walls.

The installation of the crown and light balance mouldings will require the use of a good quality chop saw with a fresh sharpened finishing blade to be able to obtain straight and tied mitter joints. I keep a saw with the proper blade that I only use to cut mitters.
Instead of regular carpenter glue I prefer to use a profesional wood adhesive with a fast set and cure time in my crown and light balance mitter joints, the stregnth of a professional adhesive allows me to avoid using nails to reinforce the joints.

The use of clamps, shims and laser level lines allows us to fastening the cabinets boxes together following straight leveled lines while paying attention not to force cabinets out of square. All joints lines should be flush and straight.

Handling and moving cabinets should always be done with extreme care, avoiding to damage the edgebanding edges and corners

Selecting and using the proper screw sizes will prevent breaking through to the other side of panels and cabinets. I use 1 inch # 8 screws for 5/8 gables and 1 1/8 # 8 screws for ¾ gables. Cabinets should be always screwed to the walls studs or plywood blocking previously installed inside the walls for cabinets installation. I use 2, 2.5 or 3 inches screws to attach cabinets to the studs or blocking. Its always a good idea to be aware of a shower, bathroom or laundry room in the other side of the wall in order to be carefull about water lines running inside the walls when we are screwing the cabinets in.

Adopting the habit of blowing out clean all the drawers sliders before inserting the drawers back into the cabinets will prevent the saw dust or dirt from getting inside the sliders and intering with the proper functioning of the tracks.

Lining up and adjusting all doors and drawers faces is maybe one of the last things to do before completing the installation. Drawers faces should always be line up before drilling holes for the handles installation.

Installing the doors and drawers handles should be done with extreme care, paying attention to consistency and symetry.


Every type of millwork installation has its own unique particularity and details but from the simplest to the most elaborated and complex, all demand the same concentration and use of the carpenters knowlegde at every step of the installation project.


Monday, April 15, 2013

Stairs Treatment


Stairway Treatment

Renovating an stairway could add considerable value to a house.

Threads and Risers

Replacing carpet or hardwood floor threads for one piece solid threads can be laborious but a very straight forward task if you are well prepare for the project.
Home depot usually carries solid maple threads that come combine in a package with a piece of maple veneer plywood to be install as the raiser. The package sales for less than 40.00 dollars for step.
Others suppliers sell oak for about the same price.
This price is only for pieces approximately 40 inches long, longer threads will be more expensive of course. I have some suppliers that will give us a very good price for custom sizes and woods.

Railings

Railings bring beauty to the stairs.
There are many designs to choose from at the time to replace the balusters.
Newels add beauty and strength to the railings
Often a good refinishing brings back all the charm of an old railing. I often disassemble the railing and bring the pieces to the shop for a good sanding job and spray painting or finishing.

When the task calls for the use of bull noses and floor transitions a well plan design and the use of good measurements will help with the final result.

The installation of a designed wainscoting on wall side of the stairs will add elegance to the stairways and it will replace with its chair rail molding at the top the use of a bad looking hand rail fasten to the wall.


Task complexity : medium

Please feel free to contact me to inquire about building procedures, materials, cost or any other question related to the work we do. I will be happy to answer all questions.


The practical use of the space under the stairs is a custom feature that add storage space to a home.


Custom Laundry room


The laundry room can be one of the most utilitarian spaces in a family home when it has been a well planned and designed space.
When building a custom home, taking the time to accommodate all the functions and tasks that will be taking place inside this room will result in making live a lot easier for years to come, besides adding to the house the kind of custom design that must people would love to have. 
These are the details that make a house superior to similar properties and mark a price difference between houses in nearby locations.
I will outline few features that make a laundry room a very functional space and therefore should be taking in consideration at the time of building or renovating a home.

1- Laundry chute : a laundry chute is a channel built from an upstairs location to the downstairs laundry. Often the chute will start near an upstairs bathroom inside a closet or cabinet and finish in the laundry room downstairs often also inside a cabinet, where a laundry basket will receive the laundry.

2- Swinging door : a swing door is a door that opens both ways. Its a practical room to install in a laundry room because it makes possible to pass through it without using our hands to open it. It is That is very common for someone enter or exit the room carrying baskets full of clothes.

3- Motion sensor lights. Lights turn on and off by it self when someone walks into the room or open the door.

4- Built-ins laundry bins : built-ins dirty laundry baskets, located under the working counter or inside a custom cabinet, usually three bins, to be able to sort out dirty laundry before washing.

5- Fold out or slide out ironing board : the iron board is hidden inside a cabinet and folds and slides out when need it.

6- Working counter with under-cabinet balance lights : One or two working counter will be very useful space to classify dirty clothes and fold the clean clothes.

7- Cabinets and plenty of storage spaces and drawers are never enough in a laundry room. Hanging rods and drying racks.

8- A counter sink is always useful to have in the laundry room.

9- An important detail to consider when building a laundry room is to look into the possibility of sound proofing all the walls and ceiling of the room. That way the noise of the washing and drying machines will not be hear in other rooms of the house and will allow for a comfortable use of the room at all times of the day or night without inconveniencing people in other rooms of the house.

10- At the time of construction it would be also a good idea to install blocking in the areas of the wall where it could be need it in the future to install hardware and others utensils on the walls. When building a laundry room I board the walls up with 9/16 OSB sheets first, that way there will be blocking all around the room for installations in the future.

11- Installing a floor drain in the laundry room is a building code requirement in most districts, just make sure it is place in the proper location and the floor slopes to it.

Sunday, April 14, 2013

Matters to consider when finishing a basement

Finishing the basement will always be an investment that can increase the resale value of your home while let you enjoy the benefits of the added living space, the basement can be an excellent part of the house with many uses, from an entertainment room to an office or an exercise room, among so many others.
Having the luxury of a finished basement in the home in many cases can make or break a potential buyer will to purchase the house. Unfinished basements are a deterrence to many buyers.
The benefits of finishing your basement will always outweigh the cost of doing the job.
Once the decision is made there are few things to take in consideration :
Finishing the basement will eliminate easy access to most of the electrical wires or plumbing pipes that are usually exposed in an unfinished basement. We finished a basement once just to find out that the home owners liked our work so much that had decided to do a massive kitchen renovation in the main floor that required moving electrical and plumbing to a new location for an island. Luckily we were able to get access to pipes and wires lifting the kitchen floor, but it would was a lot easier to run all those cables and pipes through the open basement ceiling just like it was four weeks before. Thinking ahead will save money in the future.
Family needs for space change with time, and even if the urgency for extra space or rooms seems not a necessity at the present time the needs for a bathroom or an extra bedroom could be reality in the future. If the renovation budget is not large enough to pay for these additions at this time at least it would be good to extended to cover the plumbing and electrical rough ins
Remember, when you are renovating your home, the renovation project can always be done through faces as long as every step is guided for one master well detailed plan.
In cold climates the most important part of remodeling a basement is how to insulate the walls and floor of your basement. Faulty insulation procedures are the main cause of mold. Understanding how vapor barriers work will help at the time of insulating your basements walls and prevent mold problems to develop in the future.
Insulating the concrete or block masonry walls before framing the basement walls it is the proper way to start the project. Spray foam or foam boards can be install to achieve the separation of the foundation walls from the framing and insulation products that promote mold growth. Omitting this procedure is a regrettable mistake at the time of renovating a basement.
Framing the basements walls is an straight forward procedure with some minors modifications to adapt to the conditions of the basement. Fiberglas insulation can be use to insulate the studs wall cavities and spray foam is a perfect option to insulate the rim joist cavities above.
Insulating basements floor is an important factor to consider when intending to create a comfortable warm energy efficient space. There are a variety of products in the market that can be use, but the height of the basement will dictated which procedure will be most suitable to install without losing a considerable amount of space between finished floor and the ceiling of the basement.
The building codes required a minimum ceiling height of 84 inches over the majority of the floor area. Other areas as bathroom, hallways and task areas can have a ceiling dip as low as 76 inches. All bedrooms window need to be at last 5.7 square feet.
Fireproofing the basement from the rest of the house will help to make a safer home. One way to achieve just that is installing Roxul Safe and Sound insulation in the ceiling joist cavities. The insulation will work as a retardant in the case of a fire.
If you are converting the basement to a rental apartment or mother-in-law suit soundproofing the basement can be a good way to go as well. Sounds get through in two ways, it can be transmitted or leaked. Preventing leakage can be as simple as sealing all openings while preventing transmission will required procedures to block, absorb or insulate the sound. In generally soundproofing a basement will depend on two things, how much soundproof you want and how much you can spend to achieve it. Nevertheless is something to ask yourself before entering a basement renovation project.
Taking care of the proper heating and cooling of every room in the basement will require to have the duct work necessary to distribute the warmed or cooled air in the most efficient way. This need to be taking in consideration at the time to place the interiors wall to make sure they can properly host the duct work.
Choosing the most appropriated lighting for the basement is an important decision to consider at an early stage of a basement finishing project. Recessed or surface mounted lighting fixtures require a different preparation that starts long before the walls and ceiling can be insulated and boarded up. Recessed lights make the room to feel much more spacious but are more difficult to install and it can be challenging to get them symmetrically laid out.
A bathroom in the basement is always a valuable addition to any home and one that for sure will make a difference in the overall price of the home.
Either you are looking for a plain or a more decorative finish look in your basement they are details that will bring a more charming feeling to the basement. The form and style the stairway or entrance to the basement is design will have an impact in the way the basement integrates to the rest of the house.
The inclusion of custom built cabinets in the design will enhance the look and style of the project while helping to maximize the storage space available.
The combination of plaster, drywall and wood materials and tones will bring warm and elegance to any design chosen for a basement renovation.
The basement is an ideal location for professional designed and built entertainment room due to its conditions to insulate sound among other reasons.
Laundry room located in the basement are always a good idea due to the minimum damage risk in case of flooding.
Most of the high end custom homes we had worked on have a designated space in the basement for a wine room, a walk in humidor or/and a home theater, basements are very welcoming to these kind of spaces.
But in generally basements can accommodate any room as long as they are design and built with great attention to details. I always remember an amazing office we built for a customer in the back part of the his home's basement behind hidden doors that simulated a bookshelf. There was not a better place in the whole house to build such a private place.
It is my personal experience that once we finished the basement of our own home we found our self spending more time enjoying our space down stairs and using less and less our main floor family room.
Basements when renovated with taste and functionality on mind can become in one of the most captivating spaces in the whole house.


Thursday, April 11, 2013

Doors installation

Door installation is one of the most experience demanding task in the construction  of a new house or during a renovation project with new doors to install. It can be even more detail oriented task in the case of a project where the old doors will be install into the new openings created during the renovation. Though only in the case of extremely valuable doors, the option of keeping  the old doors would be a practical one. In most cases new doors are reasonable priced and they bring a good value to a renovated home.

I had installed slab doors and then decorate them with a custom trim design to match existing patterns in the architectural design in the home. The home owner loved it.

The door installation process starts at the time of designing in which directions are the doors gonna swing in every room or if a pocket door would be a more practical option for an specific room. Pocket doors require custom framing and need some hardware installation long before the walls are boarded up.

One important detail to keep in mind when framing the doors openings is to make sure there is enough space behind the hinge side of the opening to easily fit the casing and back band that will be install at the time of trimming the house. Lots of time this is a detail overlooked that leave no option that rip that side of the casing, taking the beauty away from it.
Framing the openings at least 3 ¾ inches bigger that the door will make sure that it will be enough room to fit the door jams, shims and still have enough room to properly level the door during the installation. Accurately installed doors should stand still at every angle of their opening without moving or swinging on their own.

The process of preparing the doors for installation consists in many cases of beveling both edges of the doors and routeing a cavities for the hinges in the door and in the jam. These are tasks that require not only experience but the proper tools to be able to perform a high quality job.
When the high of the door itself has to be adjusted, the doors are usually cut at the bottom and it is always recommended to seal that side of the door after the cut.

When hanging a door I use temporary hinges saving the real hinges for after all the finishing is done, that way the painting job can be done without having to worry about covering the hinges.

Door stops, hardware and casing will complete the process of installing a door. Replacing the casing around an important door with a custom design as columns or insert molding panels will add decor and turn that door into a focal point of an area or room.

Leaving the proper space between the door and the jams can help with the fact that the door can rub  against the jams in the future with the humidity changes inside the home.
Proper installation of a door calls for a maximum of 3/8 space between the bottom of the door and the floor.

Door installation is a task that often requires small adjustment at the time of the lock installation or after the floor is installed.   


Tuesday, April 9, 2013

Crown molding installation

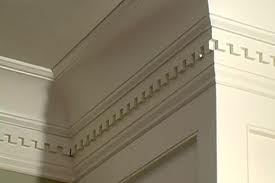
 Crown moldings are a decorative transition usually between the walls and the ceiling and reach their full design purpose when combine with others walls and ceiling decorative patterns.

The installation of crown molding is a task of medium complexity and it requires of certain grade of experience to be able to perform a high quality installation.

Seasoned carpenters know all the tricks, gadgets and procedures to make crown installation an easier and efficient project. Professional tools, sharp blades and proper procedures are signs of a high workmanship and also contribute to beautiful results.

When there was time to hire help, I run a short in shop test of crown molding installation among the applicants. I was always surprise to find out how many of them fail to perform a proper installation. In the other hand, someone that handles crown installation in an effortless and precise way in most cases can master a whole range of others tasks with similar precision.

Attaching backboard strip to the ceiling and walls is always a good preparation before a crown molding installation. It helps to even out differences between the ceiling and the walls and a practical solution for a stronger installation. When installing multiple pieces crown molding, the top and bottom moldings of this more complex designs often serve as the backing pieces for the installation.

When given the choice between wood and plaster crown molding, plaster crown molding installations are always more durable and resistant to cracks and splits and usually easier and cheaper to repair than wood crown moldings. Crown moldings splits and cracks at the joints are common due to seasonal temperatures and humidity changes and house movement in new buildings.

When running plaster crown molding around a perimeter of a room that includes built-ins units, attaching strips of ¼ thick dry wall to the cabinets fascia will allow to continue with the plaster crown molding on top of the wooden cabinet, integrating the best of both worlds and creating an uniform continuous look.

Crown molding holder
Three piece Crown molding